ArcXP PowerUp
We support embedding Tickaroo liveblogs into your ArcXP CMS using a custom powerup. The following document will provide documentation for how to install and use this so-called PowerUp.
Download
You can download the current version of the PowerUp from our public GitHub repository.
Installation
Please follow these steps to install the PowerUp into your ArcXP installation:
- Donwload and extract the .zip-file containing the necessary files
- Copy the “TickarooLiveblogPowerUp” folder (and its contents) from
components/featuresto yourcomponents/featuresfolder - Copy the “tickaroo-liveblog.js” file from
content/sourcesto yourcontent/sourcesfolder - Open
environment/index.jsonand copy the configuration from there to your active environment (most likelyenvironment/index.jsonin your installation). You will need to enter your ownclient_idandthemeIds there, as well as select whether to use SEO prefetch. See more under “Configuration”. - If you have not already done that, eject the
article-body-block(see the ArcXP documentation). - Copy “TickarooLiveblog.jsx” from
components/chains/article-body/_childreninto the_childrenfolder of the ejected article body chain. -
Add the custom embed into the
default.jsxof the ejected article body chain like this (compare tocomponents/chains/article-body/default.jsxfrom the downloaded PowerUp):switch (type) { case 'custom_embed': switch (item.subtype) { case 'Tickaroo Liveblog': return <TickarooLiveblog key={`${type}_${index}_${key}`} embed={item.embed} />; default: return null; } - Bundle your installation (run
npx fusion zip) and deploy it (PageBuilder Editor > Developer Tools > Deployer).
Set-Up
Now, all the necessary data is uploaded to your running ArcXP configuration. Please follow the provided steps to set up the PowerUp for your usage in the CMS:
- In the PagerBuilder Editor under Pages, create a new page to host the PowerUp. Make sure to note down the URI. The following steps will use
tickaroo-liveblogas the URI. - Open the newly created page. Under Curate > Blocks add the
TickarooLiveblogPowerUppowerup. Share and publish the changes. -
Switch to Composer. Under Settings > Content elements click “Add custom embed”. Create a new custom embed using the following configuration:
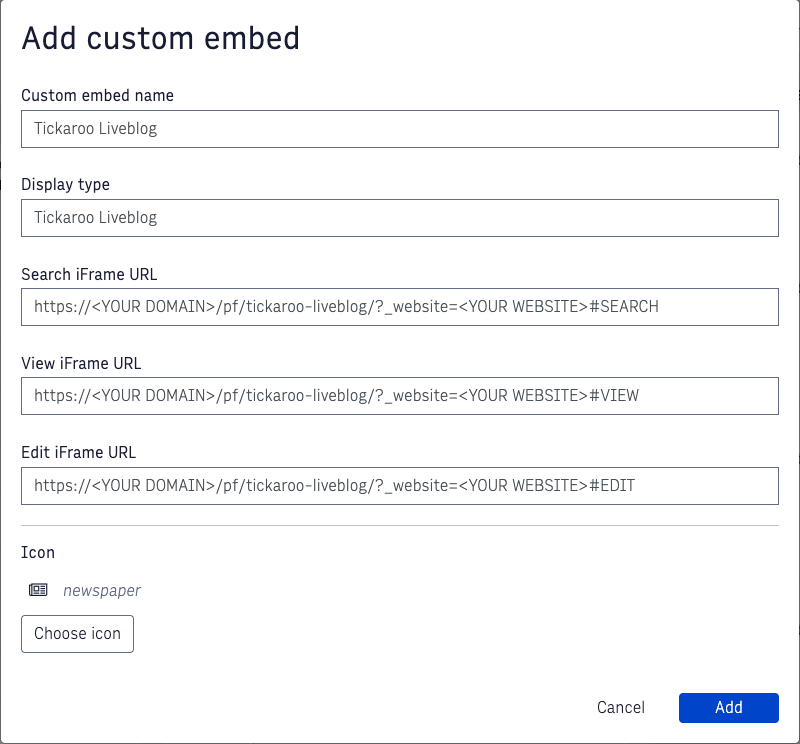
Be careful to insert your own domain and website name. Replace
tickaroo-liveblogwith whatever URI you chose in step 1. The Custom embed name and Display type need to be the same!
Usage
Now that the PowerUp is finally set up, you can add it to your stories!
- Open a story you want to add a liveblog to. Click “Add content” and select the “Tickaroo Liveblog” content.
- A configuration form opens now. Paste the ID of your liveblog (see “Configuration”) into the form and select a theme. Click submit.
- A preview is now visible in the CMS. In the draft preview (and the finished, published story) the whole liveblog is visible!
(You might need to make sure that the new article-body-chain is used in the relevant templates.)
Configuration
You will need to set a view options in the environment file and the content configuration. Here will be a short explanation on where to find and and what they mean.
TIK_CLIENT_IDID of the API Client to use. Can be found in Pro settings.TIK_USE_SEOBoolean indicating whether to use SEO prefetch.TIK_THEMES.idID of the theme to use. Create themes in pro (Settings -> Widgets) to preconfigure display options and colors.TIK_THEMES.nameThe name of the theme that will be displayed during content configuration.liveblogIdID of the Liveblog to Embed. Can be found in Pro.
SEO prefetch will cause the ArcXP system to fetch HTML code from the Tickaroo backend and insert it into the webpage before delivering it to the user. This can improve load times and optimizes search engine visibility. More information can be found here.
Our Liveblog embed only runs if the request origin matches your Enabled domains. Configure this under: Settings → Integration → Enabled domains.